Appearance
User Credentials
Instructions on how to integrate User credentials
With machine-to-machine (M2M) applications, such as CLIs, daemons, or services running on your back-end, the system authenticates and authorizes the app and provide an User-scope access token. M2M apps use the User Credentials Flow, in which they pass along their Client ID, Client Secret and Login Id to authenticate themselves and get an user-scope access token.
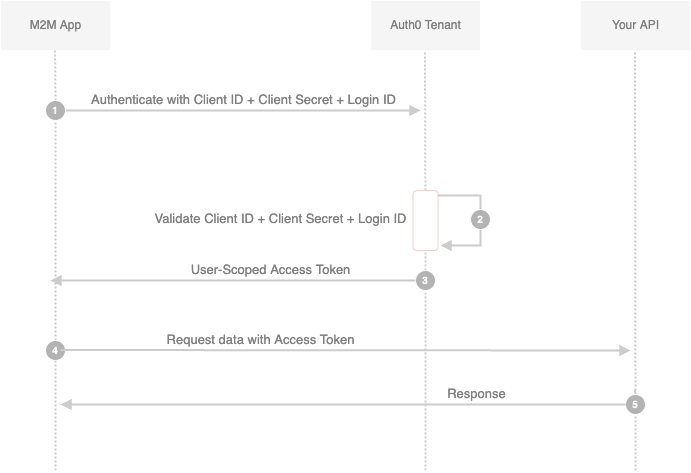
- Your app authenticates with the ATM Authorization Server using its Client ID, Client Secret and Login ID (/oauth/token endpoint).
- Your Auth0 Authorization Server validates the Client ID, Client Secret and Login ID.
- Your Auth0 Authorization Server responds with an User-Scoped Access Token.
- Your application can use the Access Token to call an API on behalf of itself.
The API responds with the requested data.
- Create User Credentials
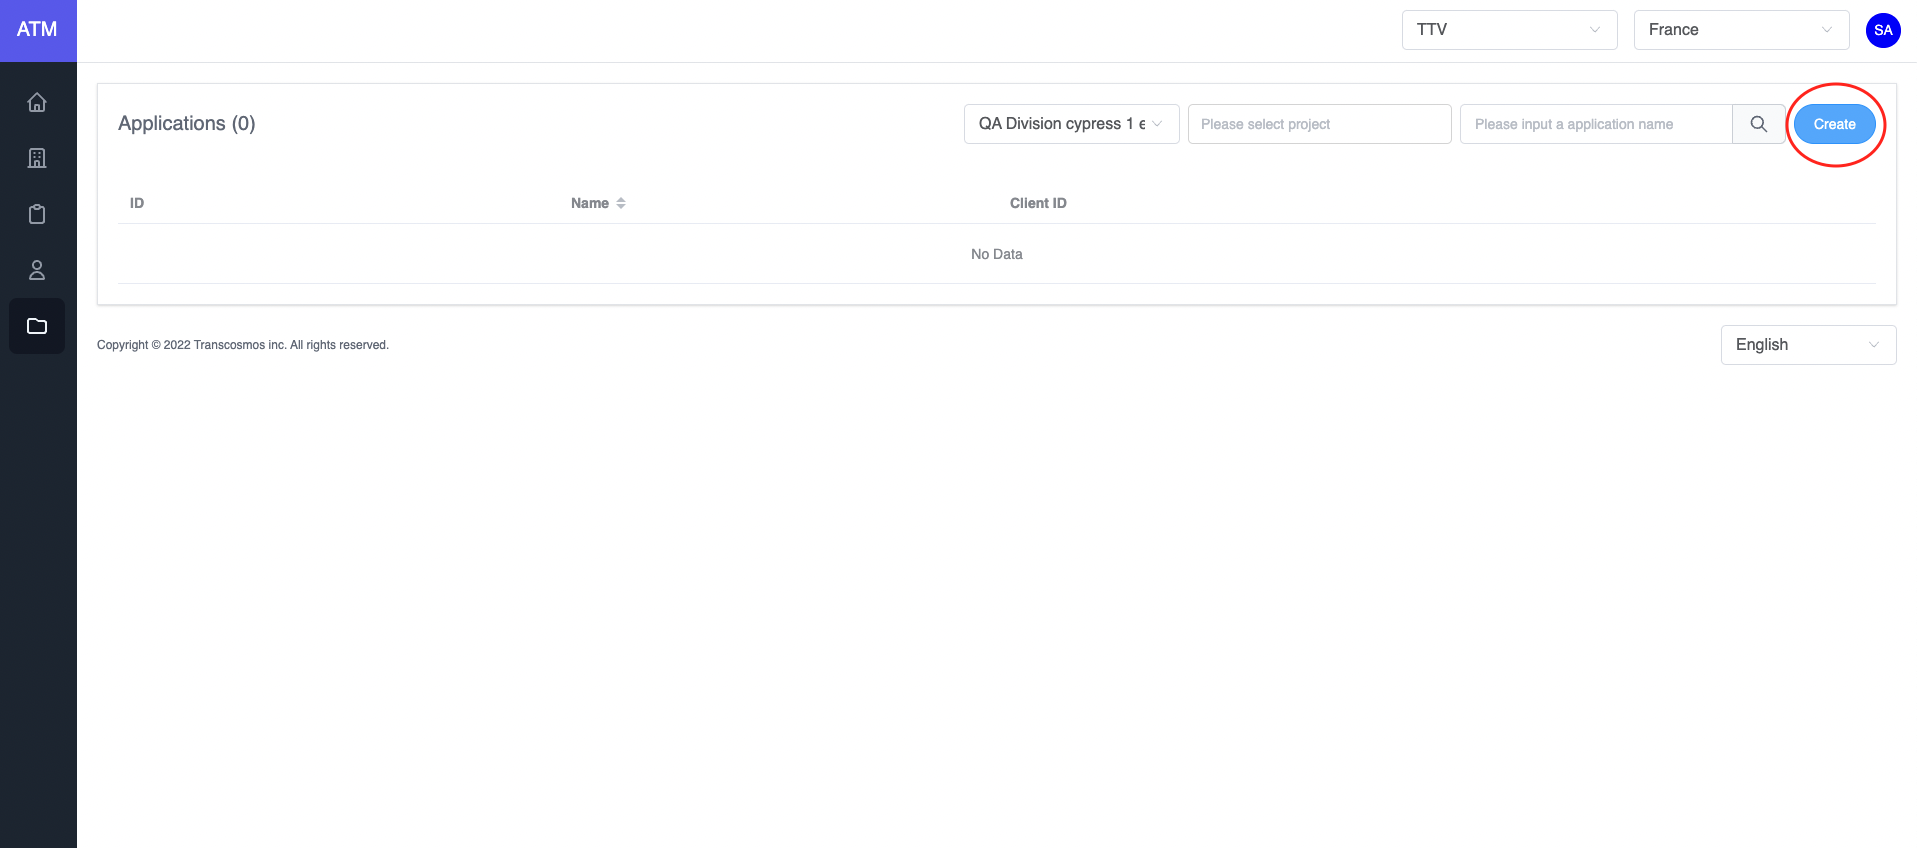
- Access the Application page
- Click on the Create button
- Choose
Authenticator TypeisUser Credentials Flow

- Integrate
After creating an application with an authentication type is User credentials. Call API to get a token (Refer to this link)
* Api:
  Name: genTokenApp
  Path: /auth/token
  Method: POST
  Payload:
json
{
  "clientId": "NmN78x6DMfde1XRx9hQg",
  "clientSecret": "480nulBeBGqJDoAOADC0CW2frGTDVEmq",
  "grant_types": "user_credentials",
  "loginId": "admin@gmail.com"
}
- clientId: Get value from the application
- clientSecret: Get value from the application
- grant_types: user credentials is authorization between machine and machine
- loginId: email of user
Example:
javascript
var axios = require('axios')
var data = JSON.stringify({
  clientId: 'NmN78x6DMfde1XRx9hQg',
  clientSecret: '480nulBeBGqJDoAOADC0CW2frGTDVEmq',
  grant_types: 'user_credentials',
  loginId: 'admin@gmail.com',
})

var config = {
  method: 'post',
  url: 'https://api.dev.token.tci-pf.net/auth/token',
  headers: {
    'Content-Type': 'application/json',
  },
  data: data,
}

axios(config)
  .then(function (response) {
    console.log(JSON.stringify(response.data))
  })
  .catch(function (error) {
    console.log(error)
})- Refresh the access token
Access tokens are short lived. Refresh them after they expire to continue accessing resources. You can do so by submitting another POST request to the /auth/token endpoint. Provide the refresh_token instead of the code (Refer to this link). Example:
* Api:
  Name: genTokenApp
  Path: /auth/token
  Method: POST
  Payload:
json
{
  "clientId": "DwSljVC4Ycr5YAv2Qbkf",
  "refresh_token": "",
  "id_token": "",
  "grantType": "refresh_token"
}
-clientId: Get from application
-grant_types: "refresh_token"
After authentication success, ATM will return the access token
javascript
var axios = require('axios')
var data = JSON.stringify({
  clientId: 'DwSljVC4Ycr5YAv2Qbkf',
  refresh_token: '',
  id_token: '',
  grantType: 'refresh_token',
})

var config = {
  method: 'post',
  url: 'https://api.dev.token.tci-pf.net/auth/token',
  headers: {
    'Content-Type': 'application/json',
  },
  data: data,
}

axios(config)
  .then(function (response) {
    console.log(JSON.stringify(response.data))
  })
  .catch(function (error) {
    console.log(error)
  })
Response data:
json
{
  "access_token": "", // New access token
  "exp_access_token": 600 // Time expiration access token is 600 seconds
}- How to validate the access token RSA 256
Call API to get the login key: (Refer to this link)
  * Api:
    Name: getJWKS
    Path: /auth/.well-known/jwks.json
    Method: GET

Example:
javascript
var jwksClient = require('jwks-rsa');
var client = jwksClient({
  jwksUri: 'https://api.dev.token.tci-pf.net/auth/.well-known/jwks.json'
});

function getKey(header, callback){
  client.getSigningKey(header.kid, function(err, key) {
    var signingKey = key.publicKey || key.rsaPublicKey;
    callback(null, signingKey);
  });
}

jwt.verify(token, getKey, options, function(err, decoded) {
  console.log(decoded)
}
Decoded token:
json
{
  "iat": 1662429262,
  "iss": "atm",
  "exp": 1662429442,
  "aud": "T_1kwjq0gTKGW6-g4O8OF",
  "scope": {
    "email": "admin@gmail.com",
    "id": "D7aaqWe34vWj_Bd-uuP8N",
    "firstName": "Thong",
    "lastName": ""
  }
}